 Screwing up the harvest can ruin an otherwise good crop.
Especially if you get the timing wrong.
That’s why we will spend just as much time of the ‘when’ as we will on how to harvest cannabis.
You’ll see that the actual harvesting is not hard at all.
It’s just a matter of treating your plants with care so as not to damage the buds.
Contents
When To Harvest Cannabis
There is no exact right time to harvest your buds.
That’s because the right time to harvest depends on what you want.
Harvesting a bit earlier will yield buds that give you a buzzed, heady experience. They can actually cause anxiety and headaches in some people.
Harvesting a bit later, results in buds that give you more of a stony, relaxing high. Harvesting very late results in weak buds that makes you extra-sleepy (why would anyone want this?).
The good news?
There is a fairly large window of time for when you can harvest your buds. And if you hit that window, you avoid a common mistake among beginning weed growers.

It all depends on the strain and your personal preference.
Just make sure you don’t harvest too early. That is the number one mistake beginning growers make. For that reason, it is generally a good idea to wait a bit longer than you think you should.
How do you even get to the point where you think you should begin harvesting?
There are two main methods. The first is easy, but less accurate. The second requires a magnifier, but gives you a better idea as to when your buds are ready.
Method 1: Check The Pistils
The pistils are the little white hairs that grow out of your bud. They eventually they start to curl inward and darken. The actual color they can turn varies. They might become red, yellow, purple, pink, brown, etc.
The first thing you need to look for is that the buds stop growing new hairs. Many beginning growers move too fast here. Make sure your buds are done growing white hairs for good. Sometimes they stop growing them for a bit, then continue growing more.
Once no more new hairs are growing, you want to wait until at least 40% of the existing hairs have darkened. The 40% figure marks the absolute earliest you should start harvesting. But you will probably want to wait longer.
Your buds will have the maximum THC levels when 50 to 75% of the hairs have darkened. If you want as much THC in your buds as possible (this is what I shoot for), harvest within this window.
If you want some of the THC to turn into CBN, wait until 80 to 90 % have darkened. CBN is more relaxing and gives you that “fuse-you-to-the-couch”, anti-anxiety effect.
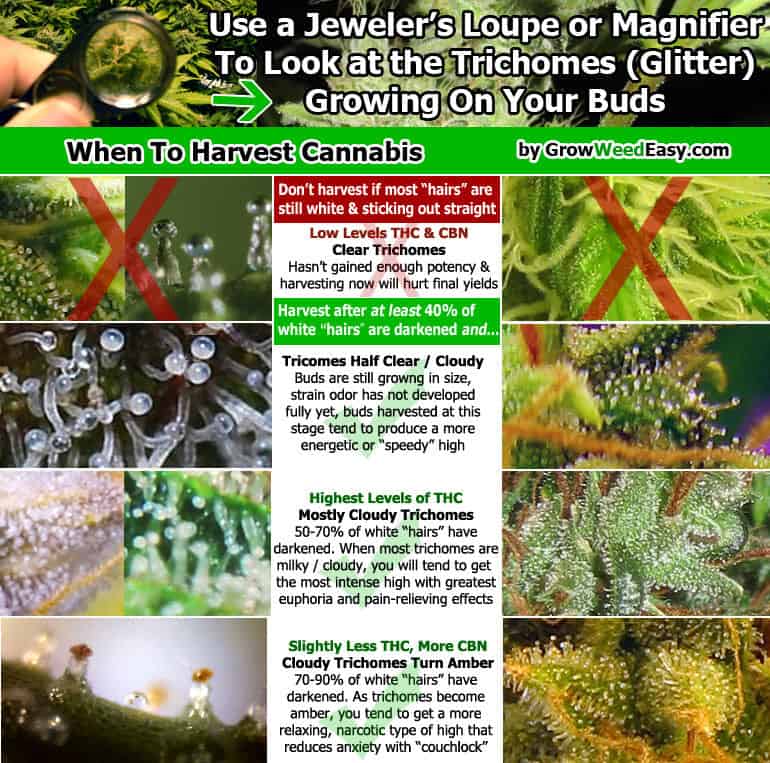
Method 2: Check The Trichomes
In order to check the trichomes, you will need to have some type of magnifier. Your best option is a digital microscope. Those give you the most accurate images. Our article on the best microscopes to check trichomes will help you find one.
But you can also just use a jeweler’s loupe like this one, if you don’t want to spend so much. They are much cheaper. I’d pay more and go with a full microscope, though. If you keep growing, you’ll want one eventually.
Whatever type of magnifier you end up getting, use it to examine the trichomes when your buds begin to approach harvest time. The trichomes are the crystals (the frosty-looking stuff) you should see accumulating on your buds.
The ones you want to pay attention to are the trichomes with the ball on top. They sort of resemble little mushrooms. These are the trichomes that give weed its potency and their color will tell you when to harvest your marijuana.
- You get more of a heady high when some trichomes are clear and some are cloudy or milky white
- You get the highest THC levels when most of the trichomes have turned milky white or cloudy
- When the trichomes have become darker (generally amber or gold, but sometimes pink or purple) you have reached the end of the harvest window. Harvesting now means more CBN for a more relaxing and anti-anxiety high.
Here is a graphic that shows you what to look for:
Now that you know your buds are ready to harvest, let’s find out exactly how to do that.
How To Harvest Cannabis
The hardest part of harvesting cannabis is knowing when to harvest it. The rest of the process is pretty straightforward.
Recommended Tools And Equipment
For the first grow, you may not want to buy all of this stuff, if you don’t already have it. You can substitute other things for now. Eventually, you’ll probably want to get dedicated equipment that you use solely for the purpose of harvesting your cannabis.
- Pruning shears or scissors
- Gloves
- Drying racks or screens or something else to hang the buds from (like a clothesline)
- Mason jars or other airtight containers
- Hygrometer
- Trimming tray or table
- Protective gear for eyes
Step 1: Prepare Your Harvesting Space
Before you begin the hacking away at your prized plants, it’s a good idea to prepare your harvesting space, so you have a clean and controlled environment for handling and drying your buds. Here’s how to get your space ready:
- Start by cleaning the harvesting area thoroughly. Remove any dirt or debris that may affect the quality of your harvest. It is best to sanitize the space using a mild disinfectant to minimize the risk of mold or other pathogens.
- Place drying racks or screens in your harvesting space to provide a suitable surface for hanging your plants to dry. Make sure the racks are sturdy enough to support the weight of the plants and allow proper airflow around the buds.
- Set up a trimming tray or table where you can properly trim the excess leaves and stems from the buds. Make sure the trimming surface is clean and comfortable to work on.
- Also get your drying and curing area ready. Ensure that the area has adequate airflow to prevent the growth of mold and mildew, using fans or dehumidifiers if necessary.
Step 2: Cut Down Your Plants
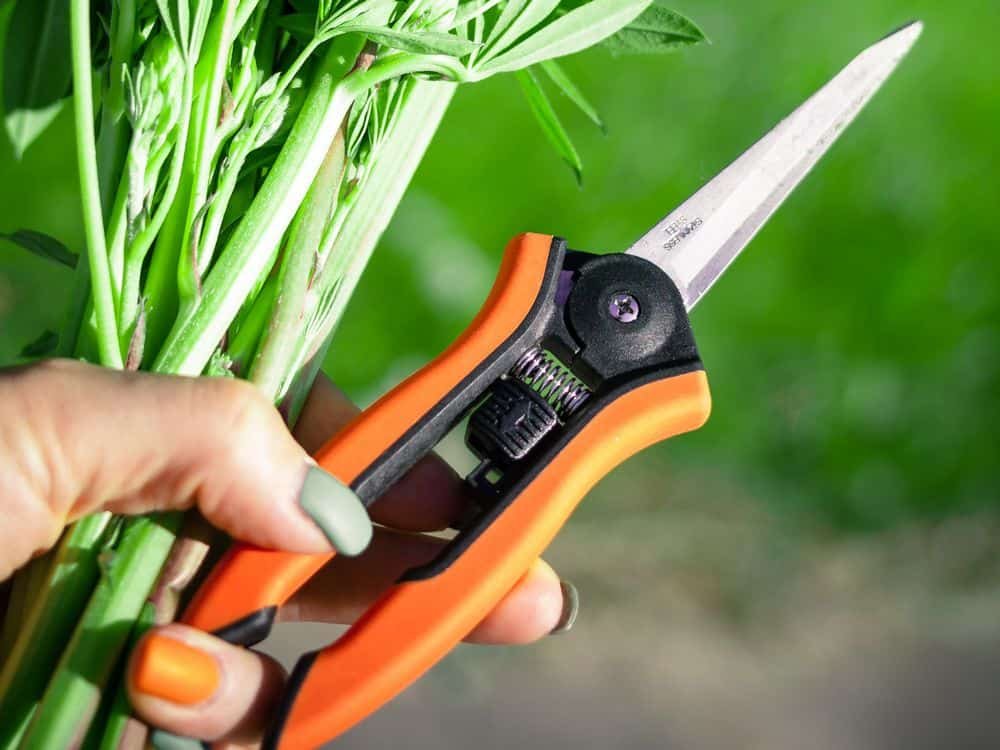
Once you and your cannabis plants are ready for harvest, it’s time to (carefully) chop away. To ensure a successful and careful cutting process, use pruning shears or scissors to trim branches. Make sure they are sharp.
When you hang your buds to dry, you want sufficient airflow around them so they can dry properly. This means you should not keep them in big bunches. Separate each plant branch by branch.
Begin by selecting a branch to cut.
Hold the branch with one hand and use pruning shears or sharp scissors with the other hand to make a clean cut. Position the blades close to the main stem and cut through the branch in one swift motion. Repeat this process for each branch you want to harvest.
Be careful not to damage the buds!
When cutting down the plants, be cautious and avoid damaging the buds. Handle the branches gently to prevent trichome loss or damage. Take care not to crush or squeeze the buds excessively, since this can affect their quality and potency.
Step 3: Trim Your Buds
Once you have cut your plants, the next step is to trim away excess leaves and stems. Take each harvested branch and carefully remove any large fan leaves that are sticking out.
These leaves do not contain a significant amount of cannabinoids and can be trimmed away. Also, look for any smaller leaves that are protruding from the buds and trim those as well.
While trimming, it is important to be mindful of preserving the buds. The buds are the most valuable part of the plant, containing the highest concentration of cannabinoids and terpenes.
Use a pair of sharp trimming scissors or shears to carefully trim around the buds, removing any excess leaves, while leaving as much of the bud intact as possible. I also have an entire article on how to trim marijuana buds.
Harvesting Cannabis: Final Thoughts
As mentioned, the hardest part of harvesting cannabis is knowing exactly when to harvest your buds. Apart from that, it’s just a matter of taking care to handle the buds gently and not damage them.
Once you have harvested the buds and trimmed them, you will want to immediately hang them up to dry. We cover the drying process in our article on drying and curing buds. That article was written specifically for autoflowers, because more people were searching for that, but the process is exactly the same, whether your plants are autoflowers or photoperiods.
Curtis says
Thank you,
I’ve been thinking and was gonna ask eventually. So, can small amounts be trimmed and tried and various stages of ripening say trying cloudy while waiting for 10% Amber?
Steven says
Yes, you can do that, as long as you use common sense and don’t cut in a way that destroys the plant.